Update 21 May 2023
Below guide is NOT working anymore.
Mullvad had to update their OpenVPN versions and removed legacy options which means you can not use this method anymore with Synology DSM version 6 (what works in version 7 I don’t know).
I found a great alternative but you’ll need to have docker running somewhere.
OpenVPN and Transmission with WebUI
The Mullvad service is included in that and you’ll need to add 1 option in the docker command:
--sysctl net.ipv6.conf.all.disable_ipv6=0
First you need to login with your own Mullvad account:
After login you can go to this page OpenVPN config file.
On that page select Android/Chrome OS as the platform and select the country you want to use to connect to. For this example we select Sweden and All cities:

Then download the zip archive.
Unzip the downloaded config somewhere on your pc. You should have a file mullvad_se_all.ovpn
Now in your Synology DSM 6.x NAS go to Control Panel -> Network -> Network Interface and select “Create VPN Profile“.
Then select “OpenVPN (via importing a .ovpn file)” and click Next.
There you chose a Profile name (something like “Mullvad”),
fill in your username (which is your Mullvad accountnumber)
and as password fill in just the letter: m.
Then select the mullvad_se_all.ovpn file you just edited as “Import .ovpn file“.
So it will look like this:

Click next.
Then click Next and select all 3 items (unless you want 1 of them to be deselected, it’s your choice but to use it in Download Station you need to select at least the 1st and 3rd option!) and lick OK.
Now select the Connection and click on Connect. And…….it should work (it can take a minute or 2 to connect so be patient)!
Testing:
You can test this by opening Download Station and adding this link to download:
magnet:?xt=urn:btih:09bc8e28f500d92d7f265f963e36424a209a444f&dn=checkmyiptorrent&tr=http://34.204.227.31/checkmytorrentipaddress.php
It comes from this website (so you can trust the link I give you :)): https://torguard.net/checkmytorrentipaddress.php
Just click on the + in your download station, select Enter URL and enter the url:
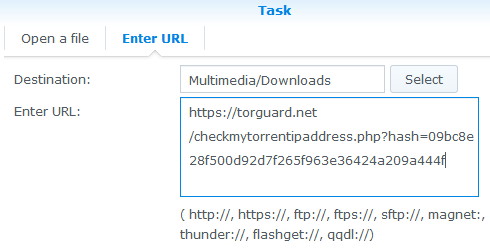
Click OK and start downloading the file. While downloading go to the Tab “Tracker” and you should see there the ip address of your VPN provider as Status!
 If you don’t use a VPN on your pc you can double check that it has a different ip address, for instance on: https://whatismyipaddress.com/.
Now you know it’s using properly your VPN provider.
You can also download a large torrent like a Linux distro (https://cdimage.debian.org/debian-cd/current/amd64/bt-dvd/ bottom of the page) and meanwhile look at the status of your VPN connection. You should see a lot of up/download activity while it’s downloading the file.
Let me know if this worked for you as well! Email LVerduijn@hotmail.com